

Whether you have pitted acne scars or other cosmetic skin concerns, microneedling is effective at achieving a smoother, younger-looking complexion. If you don’t have the extra cash to get treatments done at the dermatologist’s office, there is good news: microneedling at home works too!
My Microneedling At Home Guide lays out how I improved my acne scars and fine lines without spending a ton.
In this article, I break down how I effectively microneedle my face at home. I tried to closely recreate the treatments I have gotten done at the dermatologist’s office. It’s all at a fraction of the price as well!
Before I begin, there are some crucial steps that I always make sure to follow. Let’s jump in!

How To Do Microneedling At Home
Here is the first crucial step I follow when microneedling. I DO NOT USE A DERMAROLLER STYLE TOOL FOR THIS TREATMENT. If you have one, throw it away! When I used one in the past, I had a terrible acne breakout/infection. I also thought that it didn’t offer as good of results.
I do not prefer those “roller” type tools for this treatment because it can be hard to clean the tool properly. Subsequently there is an enhanced risk of infection. Even when I placed the tool in rubbing alcohol to “sanitize” it, I ended up with an outbreak of cystic acne in the places I used the dermaroller.
A MICRONEEDLING PEN is a much better option from my experience. It’s also closer to the devices a dermatologist’s office uses. I love using my microneedling pen due to the fact that it has sterilized needle heads that can be thrown away after a use. The movement of the pen’s head also makes you less prone to damaging your skin, which I will explain more on later.
As a disclaimer, I am not a doctor or dermatologist. I am just describing what has worked for me. Please use caution when considering this at-home microneedling review. READ IT ALL THE WAY THROUGH, and take care to use sterilized products that you’ve ordered from a trusted source.
The Best Microneedling Pen
As I said before, I prefer to microneedle at home with the device closest to what my esthetician used on me. They used the SkinPen. I’ve linked SkinPen’s website here for you to see what it is.
I found and use this microneedling pen that looks very similar to it:
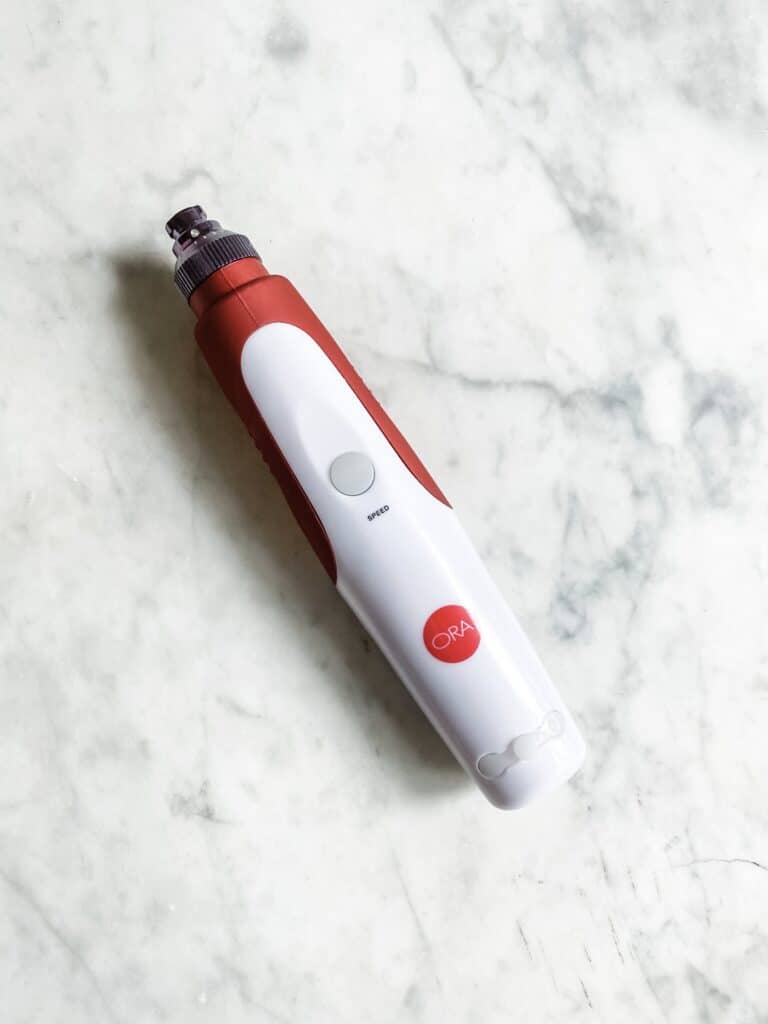
The ORA Derma Pen System
I found this ORA Electric Microneedle Derma Pen System online which has the “pen shape” & needle head I was looking for! It has TONS of great reviews too. This is the product that I have bought, used at home, and highly recommend. It is also a steal at $82 dollars. This pen comes with refillable needle cartridges that are in sterilized, individual packaging.
A single SkinPen treatment at the dermatologist costs me $300. But, I can get two treatments with this at home microneedle pen for $82!
From then on, I only need to pay the low cost of replacement needle heads (3 for $20) to perform future treatments.
ORA Derma Pen vs. Dermaroller
Instead of MANUALLY rolling across the skin like a derma roller, the needles of the ORA Derma Pen do the work for you. Just plug in the pen, and the needles move in a VERY fast up-and-down motion almost like it’s irrigating your face.
The ORA Derma Pen System feels like it’s vibrating when you use it. That motion leaves much cleaner piercings by using controlled and precise needle strokes. Using this style of microneedling pen doesn’t tear or drag on the skin which happens when you use a dermaroller.
A few paragraphs down I’ll explain the exact steps I follow when microneedling at home with this pen.
ORA Refillable Needle Tips
The refillable needle heads are available for $20 for 3 on Dermstore.com, linked here.
To me, this just feels much more sanitary and safe.
Since we are on the subject, I wouldn’t order the needles from a site like Amazon! I am not 100% sure that the products available from Amazon are as regulated for safety. Who knows if microneedling products from Amazon are packaged in a sterile way.
Dermstore.com carries this kit, which is where I ordered it from. In my opinion, I trust them as a reputable site. Buying something medically related from them feels more comfortable to me.
The instructions that come with the ORA Pen say you can reuse the needle tips once or twice. I personally didn’t do that. If you bleed during the process, it’s probably best to just throw away the needle and start fresh next time. (I do not want to risk another infection!)
Microneedling At Home Steps
For my second crucial step I follow when microneedling at home, I do not microneedle on bare skin! You can’t order your pen and get to microneedling on your face right away. There are a few other essential products I use to keep this process safe.
Here are the pre-microneedling products I always have on hand:
Apply Numbing Cream To Face
First, a numbing cream is a must-have. I use this Numb Master 5% Lidocaine Topical Numbing Cream that isn’t too expensive. I found it on Amazon, and it has lasted me a while!
I apply it to my clean face and then leave it on for 15 minutes. Then I completely remove it before I start microneedling. Microneedling can be uncomfortable, (especially on the forehead area) so I try to avoid any pain by using this cream.
Use Sterile Wipes
Second, when my face is numb and I have removed the cream, I wipe down my skin to prevent infections. They wipe down my face with alcohol when in the dermatologist’s office, so I make sure to do it too. I ordered Alcohol Prep Pad Swabs from BD on Amazon. Sometimes I need two pads to wipe down the entire face. Then I let it dry.
Apply A Facial Serum
Serum is super important after you have prepped the face. They use a gel-like serum on my face when microneedling at my dermatologist’s office. I do as well to prevent drag on the skin with the needles.
I have personally used The Ordinary “Buffet” when microneedling at home.
Not only does it provide the slip needed when using the needles on the skin, it also has skin benefits.
I just purchased The Ordinary “Buffet” + Copper Peptides and will be using it soon as well! Copper peptides are great for healing acne scars. I can’t wait to see if it helps smooth my skin.
Be sure to not use any harsh acids like Vitamin C, retinols, etc when microneedling, (Before and After). This is because your skin is going to be super sensitve. My doctor’s office recommends not resuming normal skincare for a week after treatment. So, I’ll do the same when microneedling at home. I make sure to baby the skin and hydrate it.
Gauze
When I microneedle at home, I tend to have some very minor bleeding which is natural. I use a sterile gauze to pat off the blood. This is because I am dealing with the face, blood, and wanting to avoid infections. These Cushion Care Gauze Pads from Band-Aid Brand are great for that!
Microneedling At Home For Acne Scars
Click to read my previous article about microneedling. In it I explain why it’s the best affordable solution for pitted acne scars.
I’ve also described the process of getting it done in the office. You’ll see that I promised I would share how I do pretty much the same treatment at home.
Let’s dive in!
Microneedling At Home Steps
Getting Your Microneedling Pen Set Up
Starting out, I adjust the needle length on the pen. The cheeks can typically take a longer needle length, but go shorter on the temples where it’s bonier.
Try not to go above 2 if you are doing this at home. As a generalization, a deeper needle length is more painful. Still, it’s not bad especially when I have applied numbing cream. It is more like an intense vibration sensation.
Using The Microneedling Pen On Your Skin
I pull the skin I want to microneedle taut, and then glide the needles over that area.
After applying serum to the area, with gentle pressure I create this pattern on my face:
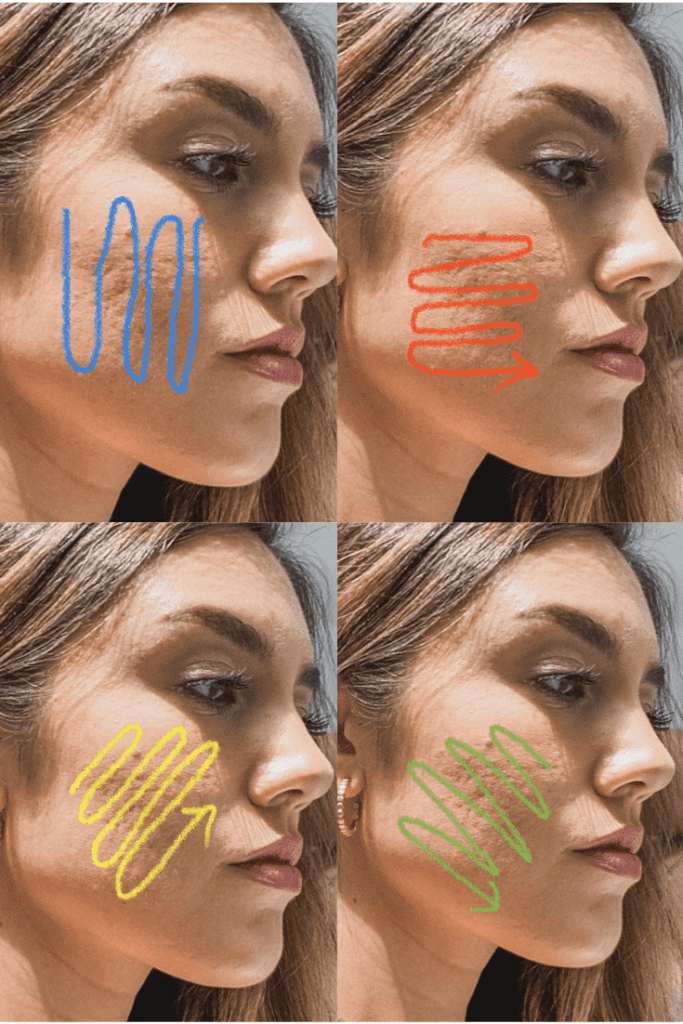
I’ll do 4 different directions.
I’m always careful around the delicate eye area. Then, I repeat all over the face in sections trying to get every inch of the skin using that pattern – applying more serum if I need to!
If I bleed, I just use the gauze to kind of pat it off. The needle does get a little bloody so I’ll switch it out if I really need to. I’m super gentle and make sure I have enough slip on my skin so the needles don’t tug or drag.
Last, I wipe off my face and run water on it. Then my microneedling at-home session is done!
What To Put On Skin After Microneedling At Home
I try to mimic what they tell me in my dermatologist’s office: only wash with cold water the first day. By the second day, you can start gentle cleansing and applying lotion.
As another reminder, stay away from harsh acids and serums for at least two weeks. Just focus on healing the skin and keeping it hydrated. Do this by adding a great facial lotion like CeraVe, and/or adding hyaluronic acid into your routine.
Take care of your skin and make sure you wear sunscreen always. After a week or so, the redness goes away, and your skin won’t be flaky.
How Long Does It Take To See Results From Micro Needling At Home?
Don’t repeat this process again until a month later! Your skin takes 30 days to regenerate and create more of that collagen you need to repair acne scars.
That is why you shouldn’t repeat the procedure again until 30 days to avoid interrupting the healing process.
So, you should see some results in about a month.
If you are new to microneedling, please take care when doing this and know that it will probably take three treatments (or around 3 months) for your skin to show pretty good improvement, depending on your own body.
Is Microneedling At Home Effective?
This dermapen at home review works really well if you are on a super tight budget.
It’s a no-brainer way to get the microneedling results pitted and wrinkled skin needs. Plus, this pen is a fraction of the price of one treatment!
The refills are cheap so you can do this at home every month or so for way less than what you will spend at a dermatologist’s office.
Microneedling at home is super effective!
But, I will say that if I have the money I really do enjoy going to the dermatologist for this treatment too. It is nice to lay back and let someone else do the work, and they have more advanced technology that I would like to try.
For example, there is a microneedling treatment called Vivace. It uses radiofrequency energy in the process to tighten skin and improve tone. I’d love to try this out as well as I heard it gives great results.
Microneedling At Home Final Thoughts
In the long run though, it is so effective and money friendly to get your own microneedling kit for at home.
There isn’t a better way to get rid of pitted acne scars at home for cheap!
There is also no harm in doing this for upkeep too, which is another bonus, and a process that will last you.
Do you also have other skin concerns like fine lines, uneven skin tone, dark spots, and/or dull skin? The ORA Pen can also help improve that, which is another great reason to try this out for yourself.
I hope you’ve enjoyed this guide as it is the key to gorgeous skin at home! Please let me know in the comments any questions you might have as I am here to help.
Have you ever used copper peptides for acne scars? Let me know your thoughts, and if you think combining it with microneedling would give amazing results!
Best, Mia

This content is for informational purposes only, and what has worked for me personally based on my own opinions. I am not a professional/medical doctor, and you should always consult your doctor or dermatologist on what will work best for you. The information presented here is not legitimate, official advice from a professional. If you choose to rely on any information from this blog, you do so at your own risk. Please refer to the “Blog Disclaimer” tab in the menu bar to read more information and the official disclaimer statement.
